Hanging mounts are sometimes necessary when growing tropical plants such as ferns, orchids, and vines in a grow tank or greenhouse. Learn more about these mounts and how to create them yourself!
In this article
- What is a hanging mount?
- When should you use one?
- Hanging mount examples
- Materials and tools checklist
- Step by step how to make a mount
- Quick Tips
- Terrarium plant tips free bonus offer
What’s a hanging plant mount? When should you use one?
A hanging mount is a vertical surface (usually wood), with a hook, which allows you to hang vining and epiphytic plant species.
Mounting plants in this way allows them to grow as they would in nature (climbing, draping, and so on, based on the species).
There are many species which prefer to grow epiphytically, including a good number of orchids and ferns.
Typically, the mount will have a sphagnum moss substrate.
These mounts are usually used in grow tanks and greenhouses.
Hanging mounts also make more efficient use of space, because you can have them hanging above potted plants.


How to create a hanging plant mount:
What you’ll need:
- Cork bark or other wood (I use ZooMed Cork Bark Flats)
- Cork bark is the best because it is water resistant, mold resistant, lasts a long time, and is attractive
- If you use other woods, research them to make sure they won’t release toxins such as allelopathic agents
- It is not recommended to use wood which was gathered from outside. It will likely harbor insects, mold, and may be partially decayed which will shorten its useful life
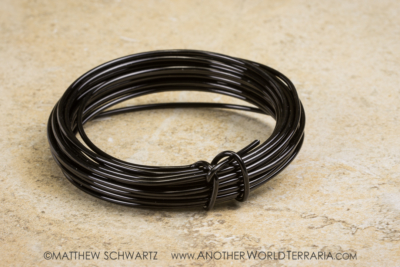
- Wire (I use Aluminum Floral Wire Black 12 gauge)
- Avoid metals which will rust, and avoid copper which can release toxic chemicals
- Wire cutters
- Sturdy ones that will easily cut the thick wire
- Drill (BLACK+DECKER LDX120C Cordless Drill)
- The linked drill is similar to the model I have, but is newer and better
- Drill bit (I have this set: Black & Decker General Purpose Drill Bit Set, 10-Piece)
- The drill bit should be just slightly larger in diameter than the wire
- Safety goggles (for use during drilling)


Important considerations for choosing a piece of wood:
The plant will determine the best piece of wood
- How large is the plant?
- A larger plant requires a larger mount
- How fast does it grow?
- A fast growing plant requires a larger mount
- What is the plant’s growth habit?
- For example: A draping species would do well on a tall mount. A wide square mount would be good for a sprawling species.
Wood preparation:
Clean the wood:
- Soak the wood in warm water for a while to make it easier to clean
- Scrape or brush off all lichen, dried moss, bark, dirt, and so on
- Thoroughly rinse the wood to get it as clean as possible
- Do not use any chemicals on the wood
The steps
- Put on safety goggles.
- Based on the plant considerations mentioned previously, decide in what orientation you want the wood to hang
- Choose where you will drill the hole. Place the hole widthwise according to the wood’s center of gravity (lopsided pieces may need a hole slightly to one side) and approximately 1/2″ from the top.
- Drill the hole
- Unwind a long section of wire from the coil and straighten it
- Insert the wire into the hole, from the back of the wood toward the front
- Push enough length of wire through that you can wrap it up over the top of the wood and down the back about 1″ to lock it on
- Bend the length of wire, which is coming out the back of the wood, straight up and parallel with the vertical surface
- Choose how long you want the neck of the hanger, then add several inches to that to allow for the hook bends
- Cut the wire at that point
- At the point several inches down from the cut end of the wire, bend the wire at a 90 degree angle, pointing backward, away from the front of the mount
- Choose the width of the top section of the hook based on how thick the surface is that you’ll be hanging it on. For example, if you’ll be hanging it on a bar with a 1/2″ diameter, a good hook width would be about 3/4″. At that length of wire from the first 90 degree bend, bend the remaining wire downward at another 90 degree angle, so it will be pointing downward toward the ground when it is hanging.


Why you should have the hook coming up the back of the mount
- It’s better for hanging tags, because they hang down the back and are hidden
- It’s easier to hang the mount close to a vertical surface

A few quick tips:
Make sure there’s adequate air flow around each mount and the plant’s foliage.
Mounts can be hung above plants in pots that like a bit of shade (just don’t restrict the air flow too much)
In a grow tank, you can create a hanger bar which will allow you to hang the plants internally in the tank, and makes it easy to slide and swap the mounts. A tutorial will be coming in the future for how to make a hanger bar.


Let me know if you have any questions about anything in this tutorial.
If you found the article helpful, please consider clicking a share button below to spread the word to your friends and fellow hobbyists.